Since its possible that a unknown person could determine our WEP key, lets consider the following:
What type of information we might be "leaking" from our wireless network.
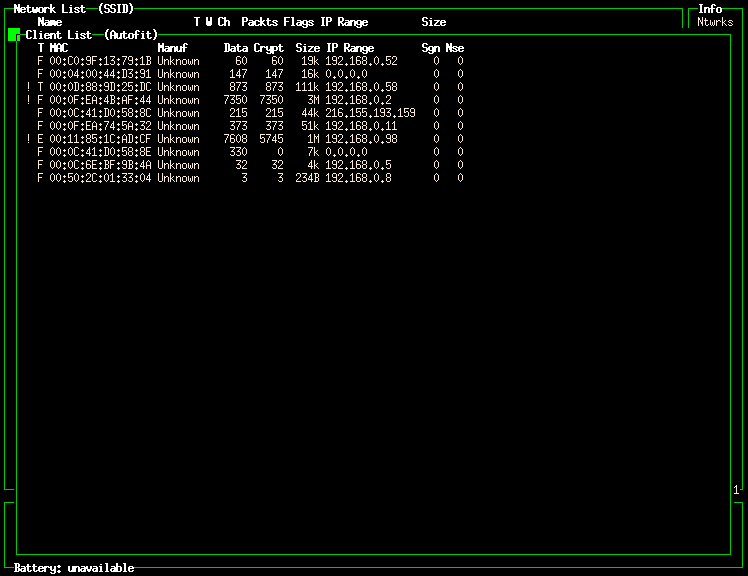
How to make use of the information shown by kismet_client to look for suspicious machines on the network.
In order to capture the network data in its unencrypted form, we need to reconfigure the kismet_server such that it knows about the WEP key associated with our network.
To reconfigure the kismet_server with
our WEP key. We will add the
wepkey line shown below to our
/etc/kismet/kismet.conf configuration file
(only the relevant portion of the file is shown).
Figure 21. Enabling WEP Decrypting
# Known WEP keys to decrypt, bssid,hexkey.  This is only for networks where
# the keys are already known, and it may impact throughput on slower hardware.
# Multiple wepkey lines may be used for multiple BSSIDs.
# wepkey=00:DE:AD:C0:DE:00,FEEDFACEDEADBEEF01020304050607080900
wepkey=00:0C:41:D0:58:8E,9D6F2D22673FA222AEDACCA799
While we're editing the
/etc/kismet/kismet.conf file, we'll go
ahead and configure the kismet_server to lock
onto channel 8. Doing this will prevent the
kismet_server from channel hopping and allow
it to capture a higher percentage of the data from our
network. To lock the kismet_server to our
network, we will specify channel 8 on the
source line and set the
channelhop option to false. The affected
portions of our /etc/kismet/kismet.conf
file now look like whats shown below:
Figure 22. Enabling WEP Decrypting
# source=madwifi_ag,ath0,atheros
source=madwifi_g,ath0,atheros,8
#source=none,none,addme
#source=wlanng,wlan0,prism2source

# Comma-separated list of sources to enable.  This is only needed if you defined
# multiple sources and only want to enable some of them.  By default, all defined# sources are enabled.
# For example:
# enablesources=prismsource,ciscosource

# Do we channelhop?
channelhop=false
Now that we've reconfigured the kismet_server, we need to restart it. We will do this by determining its process ID, killing the process, and then running the run_kismet_server script provided by the NST.
Figure 23. Restarting kismet_server
[root@probe root]# ps -C kismet_server
  PID TTY          TIME CMD
30211 pts/1    00:02:52 kismet_server
30213 pts/1    00:00:00 kismet_server
[root@probe root]# kill 30211
[root@probe root]# ps -C kismet_server
  PID TTY          TIME CMD
[root@probe root]# /mnt/wep/kismet/run_kismet_server

... lots of output to the  console as the kismet_server starts ...
[root@probe root]#
At this point, we'll bring up the
kismet_client again. This time we notice that
the IP address
(192.168.0.0) now appears on the same line as
our server.
After letting the system run for awhile (approximately 30
minutes), we'll take a look at the wireless client
list and see what machines are making use of our
WEP wireless encrypted network. To get to the
client list mode, we'll clear to welcome
message by pressing the space bar. We will then instruct the
kismet_client program to sort by
SSID. To do this, we press the lowercase
s key twice. After sorting, we will use the
arrow keys to select the line displaying information for the
ccgdom network and press the lower case
c key to show the list of client machines on
the network.
Since the kismet_server was
configured with the WEP key, it was able to
report the IP address associated with traffic
across the wireless network. This is useful to us in keeping
track of what machines are on the network. I recognize most of
the IP addresses shown, but am a bit
concerned about 192.168.0.98 (it's an
unusually high value to have been issued by my
DHCP server). Also, of interest is the
216.155.193.159 address. There should not be
any machines on our network with a
216.155.193.159 address, so I'm guessing that
this refers to IP traffic that is a direct
connection between one of the wireless machines and a machine on
the Internet, but we'll check on it just in case.
Normally, we would use tools like ping, whois and nmap to gather some preliminary information about these two IP addresses. Unfortunately, we currently have this laptop in a listen only mode (we didn't enable the Ethernet port with network access). So, we will start by making use of ethereal to examine the data from these two machines. If it looks suspicious, we will then connect our security tool to the network with a piece of Ethernet and enable the Ethernet port for network connectivity so that we can further probe these two machines.
Fortunately, we started the graphical desktop on our network security tool, so we can easily bring up ethereal and examine the captured wireless data. The following demonstrates the command sequence entered to bring up ethereal (notice how we select the smaller dump file as the larger one contains the encrypted data - prior to making use of the WEP key):
Figure 26. Using Ethereal To Look At Data From 192.168.0.98
[root@probe root]# cd /mnt/wep/kismet
[root@probe kismet]# ls -l *.dump
-rw-r--r--  1 kismet root   716460032 May  5 09:37 Kismet-May-03-2005-1.dump
-rw-r--r--  1 kismet kismet  70938624 May  6 08:13 Kismet-May-06-2005-1.dump
[root@probe kismet]# ethereal Kismet-May-06-2005-1.dump
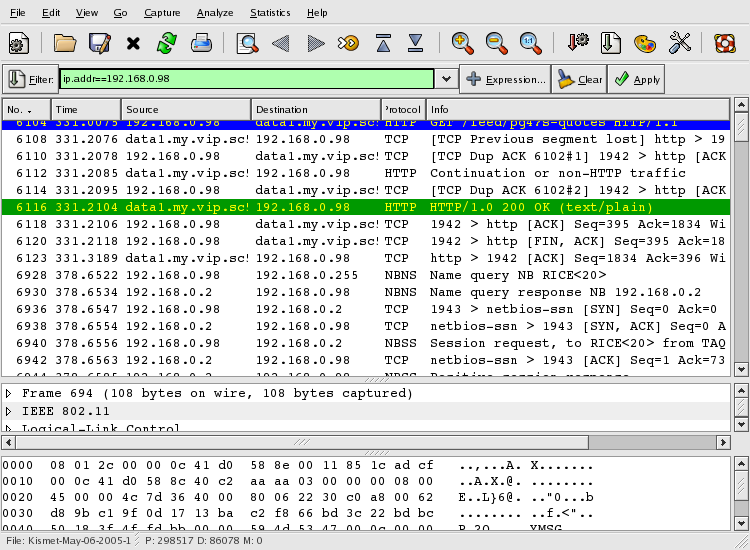
After ethereal loads the 70 MB file, we
enter a filter of ip.addr==192.168.0.98 to
check out just the traffic to/from
192.168.0.98.
Yikes! After a close inspection of the data shown above, I can tell its my wife's laptop. What's particularly SCARY (not shown above) is that I am immediately able to read the contents of her email, and see her email login and password in clear text. This isn't good and demonstrates a security issue with the POP mail protocol.
Any protocol which leaks user passwords in clear text is best avoided. This is especially true as many users are apt to use the same password for many different services (imagine if a user used the same password for Amazon as they did for their POP email account). As network administrators, its difficult to convince our users of the importance of using different passwords for different services. On the other hand, to be fair to the users, expecting them to remember hundreds of login/password combinations is not a reasonable either.
Now that we've determined that the
192.168.0.98 traffic belongs to my wife's
machine, lets take a look at the other traffic. To do this,
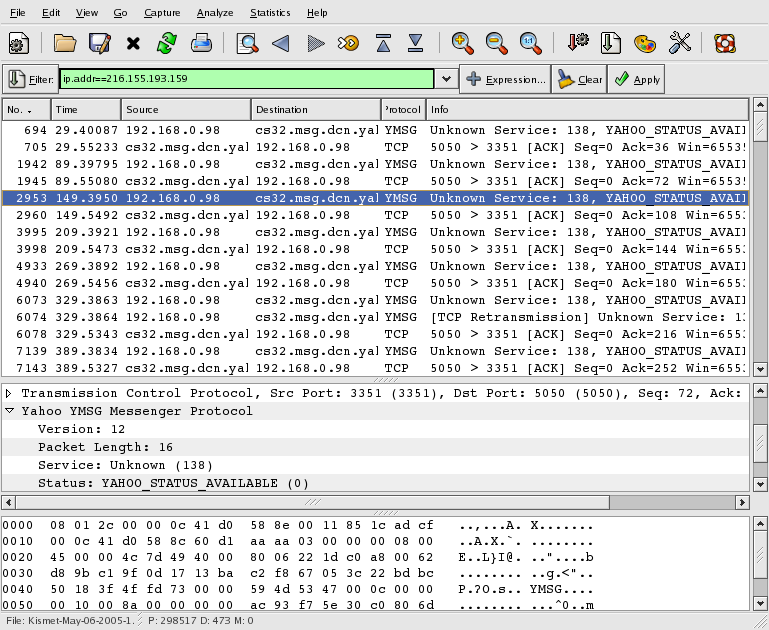
we'll change the filter to
ip.addr==216.155.193.159. After waiting for
ethereal to finish filtering the data, we see
the following:
The traffic to/from 216.155.193.159
appears to be related to Yahoo!
Messenger™. If we did not want to permit the use of
Yahoo! Messenger™ on our network, this
information would be useful in tracking down what machines were
using it.
We won't be going into too many details on the following subjects, but will offer some suggestions (and screen shots) of some other ways we can monitor our wireless network for suspicious activity.
Typically we like to know who is making use of our network. We know that Kismet makes it easy to see what clients are using the network. However, one of the more important features of the kismet_server is its ability to periodically update a XML file with the network status. This (in combination with other tools on the NST) provides us with the power to:
Apply a custom XSL style sheet which lists just the machines showing up on our wireless network.
The ability to create a cron job which periodically checks to see if any new clients show up on our network.
The ability to send an email alert to the network administrator whenever a new client machine appears.
The full implementation of this is beyond the scope of this article. However, we will provide an example XSL file and demonstrate how it can be used with the XML file updated by the kismet_server.
Here is a template XSL file which
extracts just the BSSID addresses (in plain
text) of the traffic on the 00:0C:41:D0:58:8E
network:
Figure 29. XSL File: kismet2mac.xsl
<?xml version="1.0"?>
<xsl:stylesheet xmlns:xsl="http://www.w3.org/1999/XSL/Transform"
 version="1.0">
  <xsl:output method="text" indent="no"/>
  <xsl:strip-space elements="*"/>

  <xsl:template match="wireless-network">
    <xsl:if test="BSSID='00:0C:41:D0:58:8E'">
      <xsl:apply-templates select='wireless-client/client-mac' />
    </xsl:if>
  </xsl:template>

  <xsl:template match="wireless-client/client-mac">
    <xsl:value-of select='.' /><xsl:text>
</xsl:text>
  </xsl:template>

</xsl:stylesheet>
The following demonstrates how one uses
xsltproc with the
kismet2mac.xsl XSL
file and the XML file periodically updated
by kismet_server.
Figure 30. MAC Addresses From kismet_server XML Output
[root@probe root]# cd /mnt/wep/kismet
[root@probe kismet]# xsltproc kismet2mac.xsl Kismet-May-06-2005-1.xml 2>/dev/null |\
 sort | uniq >| macs.orig
[root@probe kismet]# cat macs.orig
00:04:00:44:D3:91
00:0C:41:D0:58:8C
00:0C:41:D0:58:8E
00:0C:6E:BF:9B:4A
00:0D:88:9D:25:DC
00:0F:EA:4B:AF:44
00:0F:EA:74:5A:32
00:11:85:1C:AD:CF
00:50:2C:01:33:04
00:C0:9F:13:79:1B
[root@probe kismet]# sleep 600
[root@probe kismet]# xsltproc kismet2mac.xsl Kismet-May-06-2005-1.xml 2>/dev/null |\
  sort | uniq >| macs.current
[root@probe kismet]# if ! diff macs.current macs.orig; then \
  echo "***WARNING*** new client";\
fi
[root@probe kismet]#
The example XSL file and command line usage should serve as a useful starting point for automating the task of locating unwanted traffic on a wireless network.
Note
If the wireless network does not make use of proxy servers, this method may return a lot of false positives. Every server used by clients of the wireless network may show up in the list of MAC addresses.
Its often difficult to deploy a IDS on a home network. Home networks typically use un-managed switches and this makes it difficult to monitor all of the data on the LAN (data transmitted by one machine is not seen by everyone). However, wireless data behaves more like a HUB. We can easily monitor all of the data transmitted/received by our wireless clients.
Note
The above is rather boring output as no alerts are reported. However, boring is good when using a IDS as it means there isn't something unexpected running wild on our network.


