It is surprisingly easy to setup the necessary equipment to crack a WEP key. If you have a laptop and wireless card supported by Linux, it takes about 10 minutes to temporarily convert it into a network security tool. For this article, I made use of the following (shown in Equipment Used To Decode WEP):
- Network Security Toolkit v1.2.2
This Live CD contains all of the software tools necessary for this article (kismet, aircrack, etc) in a ready to run format. You simply boot the CD, configure it as needed, and then monitor network activity. This toolkit is freely available from https://www.networksecuritytoolkit.org/.
- vprMatrix 200A5™
This is my wife's old laptop. Its sufficient (though not my idea of an ideal laptop) for running the NST software.
Note
Deciphering a WEP key requires one to capture a large amount of data (you probably want to have at least
2GBof free disk space). As the vprMatrix 200A5™ is no longer a dedicated Windows XP™ machine (it dual boots now), I have a partition on the hard disk formatted with aext3file system. Therefore, hard disk space is not an issue for this system. If you attempt to use a existing laptop whose entire disk is formatted forWindows XP, you will not be able to make use of the hard disk (you will need to re-partition, use a USB storage device, or use network storage for data capture).- Linksys WPC55AG v1.1™
The vprMatrix 200A5™ laptop has a built in wireless card which is directly supported by the NST distribution. However, it is a
802.11bcard, and I want to be able to capture802.11gdata. The Linksys WPC55AG v1.1™ is supported by the MADWIFI project and allows me to monitor802.11gtraffic.

To convert the laptop into a network security tool, we will need to:
Turn on the laptop and immediately insert the NST v1.2.2 CD (so the laptop will boot from the CD instead of the hard disk).
Boot
pcmciamode from the NST v1.2.2 CD system (this mode provides the minimal amount of functionality required for the hardware used in this article).Physically insert the wireless card.
For the purpose of making screen captures for this article, we will bring up a X based graphical desktop. This step isn't required as all of the commands used in this article to determine the WEP key can be run directly from the command line.
Mount a hard disk partition with at least 2GB of writable space (to be used for logging captured wireless data).
Setup and configure kismet for the wireless card used and enable the logging of captured wireless data.
Note
I'm a strong believer in "type it once". Normally, I would create a single script to automate the above steps. However, for the purpose of this article, we will do everything by hand.
When booting from the NST CDROM,
one is given the chance to choose an initial
configuration. The default configuration is
desktop mode. In this mode it is assumed
you are using a standard desktop system which is networked
with an available DHCP server.
Since a non-networked laptop is being used for this
article, I will need PCMCIA drivers loaded,
but won't require network access. To accomplish this, I will
choose to boot into pcmcia mode as shown in
the output below:
Figure 2. Booting With PCMCIA Enabled
Linux Network Security Toolkit (NST) http://www.networksecuritytoolkit.org/ =======================(Linux Kernel: 2.6.10-1.771_FC2)======================== Welcome to the Linux Network Security Toolkit (NST). This bootable ISO CD is based on Fedora Core 2 Linux. The toolkit is designed to provide easy access to best-of-breed Open Source Network Security Applications and should run on most x86 platforms. Default NST boot 5.0s: desktop (USB + DHCP-Client + SSHD + HTTPD) =============================================================================== [<^F-1> Main] [<^F-2> Configs] [<^F-3> Options] [<^F-4> Help] [<^F-5> Specs] HIT SPACE BAR TO DISABLE AUTO-BOOT! NST(v1.2.2): Sat Apr 16 03:08:13 UTC 2005 boot:pcmcia
Note
It is difficult to capture initial boot screens. The above boot screen is close to, but not exactly what one sees at boot time. The information shown was captured by using a serial port connected to a different NST system. The serial output is not as "pretty" as what one sees on the console, but is functionally similar.
As we are using the unmodified public
ISO image which is publicly distributed
by the Network Security Toolkit project, we are then prompted to set the
root password.
After setting the root password, we are then prompted to
login, and we log into the system as root
with the password we previously specified.
Figure 3. Logging In As Root
Linux Network Security Toolkit (NST v1.2.2)
Kernel 2.6.10-1.771_FC2 on an i686
probe login: root
Password:
===============================================
= Linux Network Security Toolkit (NST v1.2.2) =
===============================================
[root@probe root]#
This is pretty self explanatory - we just need to
physically insert the wireless adapter into the
PCMCIA slot. Since the wireless adapter
used in this article has a compatible Atheros chip set, it
should be mapped to interface ath0 if
things go well. We can verify this by running the following
commands (after inserting the card of course):
Figure 4. Verifying Wireless Card Is Present
[root@probe root]# ifconfig ath0
ath0 Link encap:Ethernet HWaddr 00:0C:41:FC:82:3A
BROADCAST MULTICAST MTU:1500 Metric:1
RX packets:0 errors:0 dropped:0 overruns:0 frame:0
TX packets:0 errors:0 dropped:0 overruns:0 carrier:0
collisions:0 txqueuelen:199
RX bytes:0 (0.0 b) TX bytes:0 (0.0 b)
Interrupt:10 Memory:e09e0000-e09f0000
[root@probe root]# iwconfig ath0
Warning: Driver for device ath0 has been compiled with version 17
of Wireless Extension, while this program is using version 16.
Some things may be broken...
ath0 IEEE 802.11 ESSID:""
Mode:Managed Frequency:2.412GHz Access Point: 00:00:00:00:00:00
Bit Rate:0kb/s Tx-Power:50 dBm Sensitivity=0/3
Retry:off RTS thr:off Fragment thr:off
Encryption key:off
Power Management:off
Link Quality:0/94 Signal level:-95 dBm Noise level:-95 dBm
Rx invalid nwid:0 Rx invalid crypt:0 Rx invalid frag:0
Tx excessive retries:0 Invalid misc:0 Missed beacon:0
[root@probe root]#
Note
I'm not particularly fond of the warning message displayed in the output produced by iwconfig ath0 (shown above). However, I've come to live with it as the card functions for the purpose required.
Though not required, we will bring up a graphical desktop. This facilitates screen captures for the purpose of this article. The following commands are used to configure and start the graphical desktop:
Figure 5. Bringing Up A Graphical Desktop
[root@probe root]# setup_x
Starting xfs: [OK]
* ddcprobe returned bogus values:
ID: None
Name: None
HorizSync: None
VertSync: None
Could not find existing X configuration
Trying with card: NVIDIA GeForce 4 (generic)
Writing temporary config file to /tmp/tmpTRjIRDxorg.config
Trying to start X server
Waiting for X server to start...log located in /var/log/Xorg.setup.log
1...2...3...4...5....Logging to: /root/fluxbox.log
BScreen::BScreen: managing screen 0 using visual 0x23, depth 16
X connection to :17.0 broken (explicit kill or server shutdown).
X server started successfully.
Writing configuration to /etc/X11/xorg.conf
Removing old /etc/X11/X
Creating /etc/X11/X symlink
X Setup Finished.
You may want to review: /etc/X11/xorg.conf
Use the following command to start up X:
startx
[root@probe root]# startx
xauth: creating new authority file /root/.Xauthority
xauth: creating new authority file /root/.Xauthority
Release Date: 18 December 2003
X Protocol Version 11, Revision 0, Release 6.7
Build Operating System: Linux 2.4.21-23.ELsmp i686 [ELF]
Current Operating System: Linux probe 2.6.10-1.771_FC2 #1 Mon Mar 28 00:50:14 EST 2005 i686
Build Date: 24 March 2005
Build Host: bugs.build.redhat.com
Before reporting problems, check http://wiki.X.Org
to make sure that you have the latest version.
Module Loader present
OS Kernel: Linux version 2.6.10-1.771_FC2 (bhcompile@porky.build.redhat.com) (gcc version 3.3.3 20040412 (Red Hat Linux 3.3.3-7)) #1 Mon Mar 28 00:50:14 EST 2005
Markers: (--) probed, (**) from config file, (==) default setting,
(++) from command line, (!!) notice, (II) informational,
(WW) warning, (EE) error, (NI) not implemented, (??) unknown.
(==) Log file: "/var/log/Xorg.0.log", Time: Tue May 3 10:00:31 2005
(==) Using config file: "/etc/X11/xorg.conf"
Logging to: /root/fluxbox.log
BScreen::BScreen: managing screen 0 using visual 0x23, depth 24
waiting for X server to shut down
At this point, we see a graphical desktop similar to the one below.

As we need to capture a lot of data in order to decipher
the WEP key (think .5 GB to 2.0 GB), we
won't be able to use RAM disks (the machine
being used has only 512MB of RAM). This can
be a problem if the machine being used has its entire disk
dedicated to Windows XP™ (the NST
distribution does not recommend one write directly to the
NTFS partitions used by
Windows XP™). Fortunately, this
machine has been configured for a dual boot environment and
has a partition which is readable AND writable by the NST
distribution. The following demonstrates how the
fdisk command was used to identify the
partition and how the partition was then mounted to
/mnt/wep.
Figure 7. Finding/Mounting Writable Hard Disk Partition
[root@probe root]# fdisk -l

Disk /dev/hda: 40.0 GB, 40007761920 bytes
255 heads, 63 sectors/track, 4864 cylinders
Units = cylinders of 16065 * 512 = 8225280 bytes

   Device Boot      Start         End      Blocks   Id  System
/dev/hda1   *           1        3040    24418768+   7  HPFS/NTFS
/dev/hda2            3041        4864    14651280    5  Extended
/dev/hda5            3041        3163      987966   83  Linux
/dev/hda6            3164        3288     1004031   82  Linux swap
/dev/hda7            3289        3411      987966   83  Linux
/dev/hda8            3412        4864    11671191   83  Linux
[root@probe root]# mkdir /mnt/wep
[root@probe root]# mount /dev/hda8 /mnt/wep
[root@probe root]# df -m /mnt/wep
Filesystem           1M-blocks      Used Available Use% Mounted on
/dev/hda8                11219      1632      9018  16% /mnt/wep
[root@probe root]#
From the above, you should see that we have 9GB (9018MB) of
writable disk space available to us under the
/mnt/wep directory.
Note
If there wasn't sufficient hard disk space available, we still would have had several options open to us. We could have attached an external USB hard disk. We also could have made use of the Ethernet port on the notebook to connect to the network and made use of a shared network drive. The NST distribution supports the use of both NFS and SMB (Windows Shares) drives.
Setting Up And Configuring kismet
Now that we have writable disk space available, we can go ahead and setup and configure kismet. In order to accomplish this, we will do the following:
Run the setup_kismet script and tell the script that it should make use of the writable disk space under
/mnt/wep.Edit the kismet configuration file (
/etc/kismet/kismet.conf) created by the setup_kismet script and make sure it matches our wireless card and that logging of all of captured packets is enabled.Start the kismet_server so that it can start collecting wireless data.
The command sequence to accomplish these steps is shown below:
Figure 8. Setup And Starting The Kismet Server
[root@probe root]# /usr/local/kismet-2005.01.R1/setup_kismet -v -rdir /mnt/wep
*** Moving Kismet's runtime script to: /mnt/wep/kismet ...

*** Kismet's runtime script in: /mnt/wep/kismet ...
total 12
drwxr-xr-x  2 root root 4096 May  3 20:05 .
drwxr-xr-x  6 root root 4096 May  3 20:05 ..
-rwxr-xr-x  1 root root 1093 May  3 20:05 run_kismet_server

*** Edit the Kismet configuration file: "/etc/kismet/kismet.conf"
    for your appropriate wireless network adapter settings.
    Other Kismet configuration parameters may also need to be
    changed for your environment (Ex: GPS or sound usage).

*** Use the "run_kismet_server" script to start up the
    Kismet Server with NST. The "kismet_client" can then be
    used to start monitoring wireless network traffic. Also
    "gkismet" can be used within the X or VNC environment as
    a GTK GUI frontend to the Kismet wireless sniffer.


  ---- To run the Kismet Server... ----

# cd /mnt/wep/kismet
# vi /etc/kismet/kismet.conf
# ./run_kismet_server

# NOTE: 1) GPS is disabled by default...
#       2) The raw packet dump option is disabled by default...


[root@probe root]# jed /etc/kismet/kismet.conf
Note
The author of this article is more comfortable with the emacs style key bindings used by the jed editor, feel free to use vi if that's what you are comfortable with.
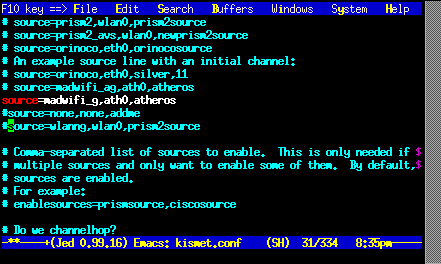
We need to make two changes to the
/etc/kismet/kismet.conf configuration
file. First we need to select the appropriate
kismet source module for our wireless card. We will
comment out the default wlanng source
line, and uncomment the madwifi_g
source line. This looks like:
Next, we need to enable the dump
option in the logtypes configuration
line. After finding the logtypes line
in the /etc/kismet/kismet.conf file,
we change it to:

Once the configuration file has been modified and saved, we exit the jed editor and use the following commands to start the kismet_server:
Figure 11. Starting The Kismet Server
[root@probe root]# cd /mnt/wep/kismet
[root@probe kismet]# ./run_kismet_server
*** Adding user: "kismet"...

*** Starting up the Kismet Server...
[root@probe kismet]# Will drop privs to kismet (10002) gid 10002
No specific sources given to be enabled, all will be enabled.
Enabling channel hopping.
Enabling channel splitting.
Source 0 (atheros): Enabling monitor mode for madwifi_g source interface ath0 channel 6...
Source 0 (atheros): Opening madwifi_g source interface ath0...
Spawned channelc control process 2954
Dropped privs to kismet (10002) gid 10002
Allowing clients to fetch WEP keys.
WARNING:  Disabling GPS logging.
configdir '/home/kismet/.kismet/' does not exist, making it.
SSID cloak file did not exist, it will be created.
IP track file did not exist, it will be created.
Logging networks to Kismet-May-03-2005-1.network
Logging networks in CSV format to Kismet-May-03-2005-1.csv
Logging networks in XML format to Kismet-May-03-2005-1.xml
Logging cryptographically weak packets to Kismet-May-03-2005-1.weak
Logging cisco product information to Kismet-May-03-2005-1.cisco
Logging data to Kismet-May-03-2005-1.dump
Writing data files to disk every 300 seconds.
Mangling encrypted and fuzzy data packets.
Tracking probe responses and associating probe networks.
Reading AP manufacturer data and defaults from /usr/local/etc/ap_manuf
Reading client manufacturer data and defaults from /usr/local/etc/client_manuf
Dump file format: wiretap (ethereal libwiretap) dump
Crypt file format: airsnort (weak packet) dump
Kismet 2005.01.R1 (Kismet)
Logging data networks CSV XML weak cisco
Listening on port 2501.
Allowing connections from 127.0.0.1/255.255.255.255
Registering builtin client/server protocols...
Registering requested alerts...
Registering builtin timer events...
Gathering packets...
Tue May  3 20:45:34 2005 Found new network "ccgdom" bssid 00:0C:41:D0:58:8E WEP Y Ch 8 @ 54.00 mbit
Tue May  3 20:45:40 2005 Found new network "Linksys" bssid 00:0C:41:C8:8B:29 WEP  N Ch 6 @ 54.00 mbit
[root@probe kismet]#
Now that we've started the kismet_server, we'll bring up the kismet_client for the following reasons:
To locate the channel of my access point (which has a SSID of
ccgdom).To determine the MAC address of my access point (we will use this information later when we run aircrack).
To lock the kismet_server to the channel used by my network. By default, kismet channel hops which means that it will miss a lot of data from my network while it is hopping through other channels looking for wireless data from other networks. By locking the kismet_server to a single channel, it will accumulate data from my network much more quickly.
We will right click on the desktop to bring up the applications menu and then select from the menu.

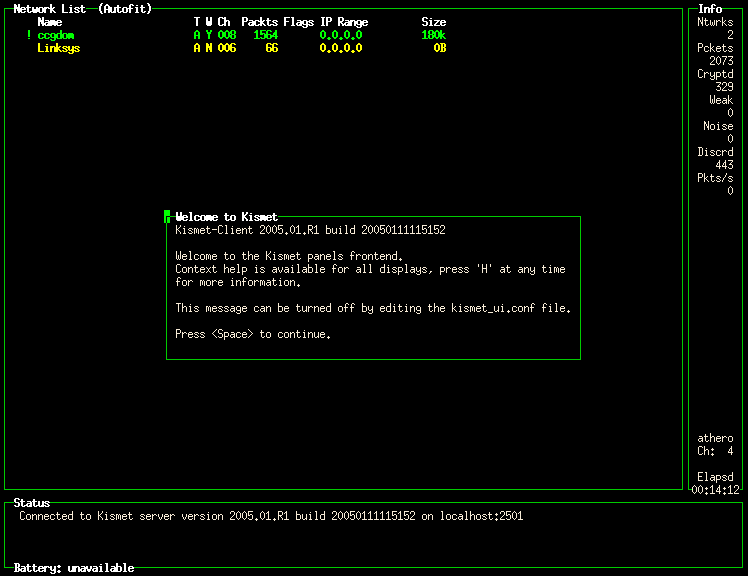
The kismet client program starts up and reports
that two networks have been found. The network I'm interested in
has a SSID of ccgdom. From
the screen capture below, we can see that the
ccgdom network is using channel 8 and
WEP encryption.
After clearing the “Welcome to Kismet”
message (by pressing the space bar), we will instruct the
kismet_client program to sort by
SSID. To do this, we press the lowercase
s key twice. After sorting, we will use the
arrow keys to select the line displaying information for the
ccgdom network and press the upper case
L key to instruct the
kismet_server to lock onto channel
8. This will allow kismet to acquire data from our
network more quickly (it won't miss packets by channel
hopping to frequencies used by other wireless
networks). At this point, we are capturing data and the
kismet_client screen
resembles:

Now that we have the kismet_server
running and capturing wireless packet data (which its storing in
/mnt/wep/kismet/Kismet-May-03-2005-1.dump),
all we can really do is wait until enough traffic has been
captured. Unfortunately, knowing when you have
enough captured data is not an exact
science. As a general rule of thumb, I don't bother running
aircrack on the captured data until I have at least .5 GB
of data, and prefer to have something closer to 2 GB of
data.
If we assumed a fully utilized network, we might estimate (very optimistically) that a 802.11g network might generate .005 GB (5 MB) of data every second. At this rate, it would take 5 minutes (1.5 GB / .005 GB / 60 secs/min) to capture 1.5 GB of data. However, we'll see that my home network produces much less data than this optimistic estimate (we'll need to wait MUCH longer than 5 minutes).
We will run a command which periodically reports a time stamp followed by the size of the captured data, waits for 15 minutes and repeats the process. By using the information reported, we can make some estimates as to how much time must elapse before my home network has leaked enough information to the outside world such that its WEP key could be cracked.
Figure 15. Estimating Capture Time
[root@probe root]# while true; do date; ls -l /mnt/wep/kismet/*.dump; sleep 900; done
Tue May  3 21:15:44 EDT 2005
-rw-r--r--  1 kismet kismet 1306624 May  3 21:15 /mnt/wep/kismet/Kismet-May-03-2005-1.dump
Tue May  3 21:30:44 EDT 2005
-rw-r--r--  1 kismet kismet 2592768 May  3 21:30 /mnt/wep/kismet/Kismet-May-03-2005-1.dump
Tue May  3 21:45:44 EDT 2005
-rw-r--r--  1 kismet kismet 4136960 May  3 21:45 /mnt/wep/kismet/Kismet-May-03-2005-1.dump
Tue May  3 22:00:44 EDT 2005
-rw-r--r--  1 kismet kismet 5423104 May  3 22:00 /mnt/wep/kismet/Kismet-May-03-2005-1.dump
Tue May  3 22:15:44 EDT 2005
-rw-r--r--  1 kismet kismet 6733824 May  3 22:15 /mnt/wep/kismet/Kismet-May-03-2005-1.dump
Tue May  3 22:30:44 EDT 2005

... continues for a very long time ...

-rw-r--r--  1 kismet kismet 711319552 May  5 04:45 /mnt/wep/kismet/Kismet-May-03-2005-1.dump
Thu May  5 05:00:45 EDT 2005
-rw-r--r--  1 kismet kismet 712630272 May  5 05:00 /mnt/wep/kismet/Kismet-May-03-2005-1.dump
Thu May  5 05:15:45 EDT 2005
-rw-r--r--  1 kismet kismet 713863168 May  5 05:15 /mnt/wep/kismet/Kismet-May-03-2005-1.dump
Thu May  5 05:30:45 EDT 2005
-rw-r--r--  1 kismet kismet 715157504 May  5 05:30 /mnt/wep/kismet/Kismet-May-03-2005-1.dump
Thu May  5 05:45:45 EDT 2005
-rw-r--r--  1 kismet kismet 716460032 May  5 05:45 /mnt/wep/kismet/Kismet-May-03-2005-1.dump
^C
[root@probe root]#
From the one hour period starting May 3 21:15 and ending May 3 22:15, we see that our capture file has grown at a rate of 5427200 bytes/hour in size (6733824-1306624). At this rate, it will take roughly 276 hours (1500000000/542720) to capture 1.5 GB of data. It looks like we are in for a long wait. However, I started on this article late at night when there is very little traffic occurring on our wireless LAN. We'll let it run over night and check the rates again later in the morning during normal business hours (both my wife and I work out of the home).
From the 32.5 hour period starting May 3 21:15 and ending May 5 05:45, we see that our capture file has grown at a rate of 19503244 bytes/hour in size ((716460032-1306624)/32.5). At this rate, it will take roughly 76.5 hours (1500000000/19503244) to capture 1.5 GB of data on my home network. As we are getting impatient, we will move along and see what aircrack can do with the 700 MB of data that has been collected so far.
After collecting quite a bit of data with kismet, we will be using aircrack to decipher the WEP key. Here are my general rules of thumb when using aircrack:
If aircrack doesn't determine the WEP within a minute or two, then more data is probably required.
It helps to specify the
-m MACADDRoption to aircrack to make certain it is looking at the packets of the network you are interested in (kismet can tell you this information).If aircrack gives up quickly, it might be worth increasing the fudge factor (the
-f fudgeoption). I've seen aircrack fail to determine a WEP key with a fudge factor of 2 and then succeed by increasing the fudge factor to 3.
In order to determine the MAC address
to pass to aircrack, I will use the
kismet_client program, select the
ccgdom network and press the Enter key. This
will display information about the network I am interested in
(shown in Network Details Reported By Kismet). I see that the network of
interest has a BSSID of
00:0C:41:D0:58:8E. This information will be
passed to aircrack in the form of -m
00:0c:41:d0:58:8e.

Now that we have 700 MB of data and we know the MAC address to pass to aircrack, we'll invoke aircrack and see what happens. The invocation is shown in Invoking aircrack Using Default Fudge Factor. After taking a bit to load the captured data, aircrack only runs for 4 seconds before giving up on finding the WEP key (shown in Failed To Find WEP).


Unfortunately, aircrack failed to decipher the WEP key with the first invocation. We'll try running aircrack again and this time, we'll increase the fudge factor to 3 and allow aircrack to explore more possible combinations (shown in Invoking aircrack Using A Fudge Factor Of 3).


As we can see (in Successfully Found WEP), aircrack was able to decipher my WEP key in 54 seconds (not counting the time to load the packet data).
Note
We had the opportunity to transfer the entire 700MB file to a dual AMD Opteron™ 1.6GHz Sun Fire V20z™ server sporting 2GBs of RAM. This systen was running the NST distribution using the SMP kernel: 2.6.10-1.771_FC2smp. Running aircrack on this box produced the WEP key in 40 seconds using one CPU and 24 seconds when using two CPUs. This demonstrates that the SMP Linux kernel scales quite nicely.
Let's pause for a moment and consider what we know so far:
Its definitely possible to determine the WEP key of my home network.
It takes a long time to capture enough data. I don't have to worry about a car pulling up at the side walk for 15 minutes and gathering enough data to break into my network. They would need to park for a long time, or make many trips out to my neighborhood.
My neighbors on the other hand could easily determine my WEP key.
After running the kismet_client for awhile, I noticed that there were 3 other wireless networks in proximity to my home. None of these networks were using WEP. Hence, I could easily be lulled into a false sense of security thinking that a person which wanted to attack a network would go after the non-WEP networks first.
Regardless of my sense of security, it is safer to assume that all data transmitted on my wireless network is visible to the world at large. As such, secure protocols (SSH, HTTPS, etc) should be preferred to non-secure ones (HTTP, POP, FTP, etc).